

Configure Account-driven User Enrollment in Intune
- Anand P
- Mar 9, 2024
- 3 min read

Updated: Oct 21, 2024
In a previous blog post, I covered the various types of enrollment available for iOS/ipadOS devices in Intune. If you haven't read that post yet, I recommend checking it out to gain a better understanding of Different types of iOS/iPadOS Enrollment In Intune.
This blog focuses on offering a detailed walkthrough for setting up an account-based user registration process, including insights into the end-user journey.
The enrollment process establishes distinct sections, referred to as containers or partitions, for Work and Personal data. These containers aid administrators in safeguarding work-related data by restricting the management of work data to the work container exclusively. Similarly, access to personal profiles is limited to the personal container. Admins have authority over Organization accounts, settings, and Intune-provisioned information only. It is crucial that admins cannot control the information and settings associated with an individual's account, ensuring the protection of corporate data in organization-managed apps and preserving user personal data from admin interference.
Microsoft Intune allows account-driven Apple User Enrollment on devices running iOS/iPadOS version 15 or newer. However, if you happen to assign an account-driven user enrollment profile to device users running iOS/iPadOS 14.9 or an earlier version, Microsoft Intune will automatically enroll them via user enrollment with Company Portal.
Table Of Content
Prerequisites for Account-driven User Enrollment.
iOS/iPadOS version 15 or newer
Here are some additional steps you need to take to enroll
To utilize Apple User Enrollment, it is necessary to confirm the domain within your Apple Business Manager. By integrating Apple Business Manager with Microsoft Entra ID through federated authentication, individual Apple IDs for users are not required. Instead, users can access their applications on their devices using the same login details as their work account.
To ensure that Apple can access the Intune service and obtain enrollment information, you must set up service discovery. This can be done by creating and publishing an HTTP well-known resource file on the same domain that employees use to sign in. Apple will retrieve the file via an HTTP GET request, for example, https://cloudtekspace.com/.well-known/com.apple.remotemanagement, you need to replace your web server FQDN instead of the one I used in the example "cloudteskspace.com"
Create a JSON file with the content type set to application/JSON, you can see the JASON file example provided in the Microsoft website Link, replace the Tenant ID with your Tenant ID for example

Steps to Configure Account-driven User Enrollment
Step1: Login to Microsoft Intune admin center https://intune.microsoft.com navigate to Devices and select iOS/iPadOS

Step 2: Choose iOS/iPadOS enrollment and then choose enrollment types.

Step 3: Click on Create Profile and choose iOS/iPadOS to generate a profile for enrollment purposes.

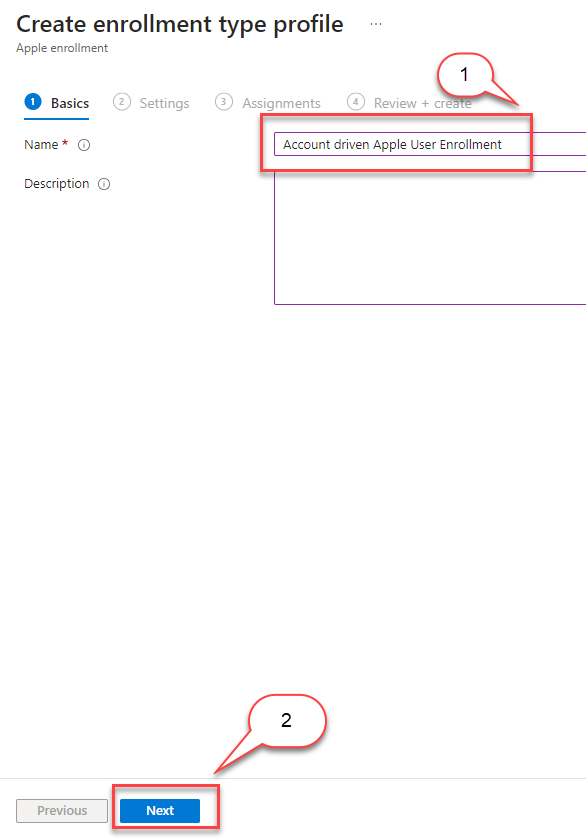
Step 4: Please provide the necessary name for the enrollment type and, if necessary, a description (for demonstration purposes, I only entered a mandatory name for the profile) before clicking on "Next" to proceed.
Step 5: Select Account Driven user enrollment and tap Next

Step 6: Select a group or all users as required, in this example, I will be using a group, tap Select to add the group or users and tap Next to continue

Step 7: Verify the settings and select Create to complete the profile creation.

Now the profile is created
Let's take a look at end-user experiences
Step 1: Open the Settings app on your iOS/iPadOS navigate to General and select VPN & Device Management

Step 2: Tap on Sign in to Work or School account... enter your work account and tap on Continue and this will look for the enrollment URL

Step 3: Tap on Sign in to iCloud ( this is managed iCloud, not personal one) tap on Continue, and complete multi-factor authentication, once completed you can see the Remote Management profile tap on Allow Remote Management enter the iPad passcode to complete the enrollment

Step 4: Now you can see the profile tap on the enrollment profile to see more details

On the admin end, they can only manage organizational data remotely as options like wipe are grayed out. These types of enrolled devices can only be retired.

How to Remove the Management Profile
Users can remove the management profile by tapping the Remove Management Option, the user needs to provide the device passcode tap on Done, and tap on Remove all the applications and data associated which is almost the Retire option.

Conclusion
Within this blog post, you will find a precise and straightforward guide detailing the steps for enrolling iOS/iPad OS devices through the Account-Driven User Enrollment method.


You have mentioned that it will redirect to prompt sign into iCloud (not personal iCloud account). Could you give some details how can i get managed iCloud or how can create this? Will it common ID for all users during enrolment?
Can we store JSON file(Name: com.apple.remotemanagement) under blob storage? Once we get the URL,
CNAME has to be created in the external DNS of the domain(company.com) point to/redirect the blob storage URL.
Is it possible?
You can achieve this by saving the json file in a webserver, make sure the location is accessible and the URL is published, or you can use redirection, in my case i had used redirection since i am using a shared webserver
you can refer this blog for some details https://www.ssldragon.com/blog/well-known-folder/
Hi .. i am unable to find how to create service discovery ?
can you please provide more details ? even Microsoft has just how to create the Json file but not how to host it or what to do with it!